What is a full bleed image? In printing, the term “bleed” refers the portion of an image that must be trimmed off because it extends past the page’s borders. Here is an example of a full bleed image on a book cover. All four sides of it must be trimmed to fit the page.
This book cover contains a full bleed image on it.
When you create any page (whether it’s an interior page or a book cover) with a full bleed image, you must leave room for trimming. Most printers will recommend allowing for a 1/4″ (quarter inch) bleed on all sides of the image when designing it. That way, nothing important will be trimmed off by mistake.
Floating Images With (or Without) Borders
Sometimes, you don’t want a full bleed image on the page. Instead, you may prefer that image to “float” in the white space around it. Here is an example of a floating image.
This book cover contains a floating image on it.
In this case, there is no need to account for trimming on any part of the image. So long as it is a print-ready file (300 DPI or better), it can be sized to fit the page however you want it to.
Preparing Graphic Files for Your Book
A graphic is defined as any picture, illustration, chart, image, logo, or graph you would like placed either in your book interior or on your book cover.
Colour Graphics
All colour graphics must be submitted to PPG in either .jpg (.jpeg) or .tif (.tiff) format. They must have a minimum resolution of 300 DPI, using the CMYK colour model.
Black and White Graphics
All black and white graphics must be submitted to PPG in either .jpg (.jpeg) or .tif (.tiff) format with a minimum resolution of 300 DPI. For best results, these images should be sent as grayscale/monochrome files. (CMYK colour images will not reproduce as well in black and white as grayscale/monochrome images will.)
What is a Full Bleed Image?
Truly, there is no right or wrong when it comes to using full bleed or floating images for your book. Much of this is subjective and all about personal preference. But keep in mind that printing a book filled with full bleed images will tend to be more expensive. These images use more ink, and there is also more time and labour involved regarding trimming the pages precisely.
You might consider syndicating this content on your own blog. If you do, make sure to attribute the original source so neither of us gets dinged on the SEO front. You can do that by including this line at the bottom of the article: This content first appeared on the PPG Publisher’s Blog and has been republished here with permission.
When it comes to book trim sizes, there are a few standards: 5″ x 8″, 5.5″ x 8.5″, and 6″ x 9″. These measurements relate to the width and height of your front and back covers in inches, as shown on the illustration to the right. This book has a 5″ x 8″ trim size.
Browse any bookstore, and you’ll see there are all kinds of different shapes and sizes of books to be found. Some of these books use a thick, glossy paper for their interior pages. Others use a thinner uncoated stock. In the traditional (trade) publishing world of corporate publishers with big budgets, they can afford to print large quantities of books on offset printing presses. This enables them to use any paper stock they want to use for their book covers and interiors. And if they want a uniquely-shaped book that stands out from the rest, they can pay to have special die cuts created to achieve that result.
As I discuss inside 3 Book Printing Tips for Indie Authors, today’s publishers (self-publishers) have more choices than we had when I started my publishing career 25 years ago. If you want to print 1,000+ books straightaway and pay the lowest possible cost per unit, you can still use offset printing. Alternatively, you can choose to print smaller quantities of books using two different digital printing solutions: print-on-demand (POD) and short run printing.
The Pros and Cons of Print-on-Demand (POD) Printing
Online worldwide book distributors, such as Amazon and Ingram Content Group, utilize POD and short run digital technologies to sell physical books online. In other words, they won’t print and store any physical copies of your paperback/hardcover book in a large warehouse anywhere. Instead, they’ll store only the digital cover and interior files that you’ve uploaded to their sites; and they will print, bind, and ship only as many copies as someone buys from them at any given time, saving you from having to print any upfront copies whatsoever. If someone goes to their site to buy ten copies of your book, then ten copies will be printed, bound, and shipped to that buyer. If another person buys only one, then they will print, bind, and ship only one—hence the term “print on demand.” This is a definite pro, isn’t it?
Now here are the cons: digital printers can only handle certain paper sizes and weights. Because of that, you’re limited to the following book trim sizes, binding types, and paper stocks/colours if you wish to sell your books online (which most of us do nowadays). The below specs come from Ingram Content Group’s Lightning Source® division.
Book Trim Sizes for POD Books With B/W Interiors
Trim Size Inches
Trim Size mm
Binding Types Available
Page Range
Paper Stock
Priced as
5 x 8
203 x 127
perfect (paperback)
18 – 1200
white
small
perfect (paperback)
18 – 1050
crème
small
5.06 x 7.81
198 x 129
perfect (paperback)
18 – 1200
white
small
5.25 x 8
203 x 133
perfect (paperback)
18 – 1200
white
small
perfect (paperback)
18 – 1050
crème
small
5.5 x 8.5
216 x 140
perfect (paperback)
18 – 1200
white
small
perfect (paperback)
18 – 1050
crème
small
case laminate (hardcover)
18 – 1050
crème
small
cloth – blue or grey
18 – 1050
crème
small
jacketed
18 – 1050
crème
small
5.83 x 8.27
210 x 148
perfect (paperback)
18 – 1200
white
small
perfect (paperback)
18 – 1050
crème
small
6 x 9
229 x 152
perfect (paperback)
18 – 1200
white
small
perfect (paperback)
18 – 1050
crème
small
case laminate (hardcover)
18 – 1050
crème
small
cloth – blue or grey
18 – 1050
crème
small
jacketed
18 – 1050
crème
small
6.14 x 9.21
234 x 156
perfect (paperback)
18 – 1200
white
small
case laminate (hardcover)
18 – 1200
white
small
cloth – blue or grey
18 – 1200
white
small
jacketed
18 – 1200
white
small
6.69 x 9.61
244 x 170
perfect (paperback)
18 – 1200
white
small
7.44 x 9.69
246 x 189
perfect (paperback)
18 – 1200
white
small
7.50 x 9.25
235 x 191
perfect (paperback)
18 – 1200
white
small
7 x 10
254 x 178
perfect (paperback)
18 – 1200
white
large
case laminate (hardcover)
18 – 1200
white
large
8 x 10
254 x 203
perfect (paperback)
18 – 1200
white
large
8.25 x 11
280 x 210
perfect (paperback)
18 – 1200
white
large
8.268 x 11.693 (A4)
297 x 210
perfect (paperback)
18 – 1200
white
large
8.5 x 11
(A4)
280 x 216
perfect (paperback)
case laminate (hardcover)
18 – 1200
18 – 1200
white
white
large
large
Book Trim Sizes for POD Books With Colour Interiors
You might consider syndicating this content on your own blog. If you do, make sure to attribute the original source so neither of us gets dinged on the SEO front. You can do that by including this line at the bottom of the article: This content first appeared on the PPG Publisher’s Blog and has been republished here with permission.
When choosing illustrations, graphics, or images for your book cover—or in your book’s interior, for that matter—you must ensure you have the legal right to use them.
Choosing Illustrations, Graphics, or Images for Your Book
There are three ways you can do this:
one, you can use illustrations, graphics, or images that you have personally created and therefore own the copyright to;
two, you can purchase the right to use artwork created by someone else;
or three, you can find public domain stock photos that are deemed as “free for commercial use” from whatever design-template program you are using, or from websites such as Pixabay.com, as I did for this blog post.
Actually, I use Pixabay graphics for most of my blog posts. I always seem to be able to find what I’m looking for there.
Choosing Illustrations, Graphics, or Images for Your Book
It is crucial to respect another artist’s copyright. If you don’t—if you just pull any image file you find off the Internet and use that for your book without first confirming you have the right to use it—you may find yourself involved in an expensive copyright infringement lawsuit down the road. This isn’t only about protecting the rights of other artists; it’s also about protecting yourself. So, do a little research before you use any images for your books. Pixabay is one of many websites containing free stock photos. You can find even more resources here: http://www.warriorforum.com/main-internet-marketing-discussion-forum/1257937-avoid-copyright-infringement-use-tool-find-free-stock-photos-your-display-ads.html.
You might consider syndicating this content on your own blog. If you do, make sure to attribute the original source so neither of us gets dinged on the SEO front. You can do that by including this line at the bottom of the article: This content first appeared on the PPG Publisher’s Blog and has been republished here with permission.
Printers and publishers have a lot in common in terms of what their graphic designers will and won’t do. Today’s post will help you understand why.
Printers and Publishers: What Their Graphic Designers Will and Won’t Do for You
First and foremost, I’m referring to hybrid publishers as opposed to traditional (trade) publishers here. When traditional publishers purchase the rights to publish your manuscript, they are also buying full creative control of the book. That means they will make all the graphic design decisions on your behalf. You won’t have much say in anything. But in the self-publishing and hybrid publishing business models, you retain full copyright ownership of the book. As such, you also retain your creative control and must make all the design decisions for yourself. (You can learn more about today’s three primary book publishing methods by clicking here.)
Printers and Publishers Won’t Make Graphic Design Decisions on Your Behalf
Printers and Publishers Need to Know This
Twice in the last ten years, I took on projects from authors who said they had no idea how they wanted their book covers to look. I pressed them for details with various leading questions. But they both insisted they didn’t know what they wanted. They asked me to have my graphic designer supply them with two sample layouts to choose from without providing any real instructions ahead of time. I cringed. I knew where this was headed. But I obliged and asked my designer to create two sample layouts based on the little information we had: the type of book, topic matter, and stated demographic.
In both cases, the designers did their best and came up with what I considered to be beautiful, professional designs. But, not surprisingly, both authors hated the sample layouts. “That’s not what I had in mind,” they both complained. It had been a giant waste of everyone’s time.
You see, even if you think you don’t know what you want, you still do to some degree. And this is important information to provide the graphic designers of both printers and publishers ahead of time.
When deciding how you would like your book’s cover and interior to appear, it’s best to browse a bookstore (whether in person or online) and view the many different examples there first. What designs, colours, and fonts draw your attention? Write down the book titles and author names, so you can use this as a handy visual reference when it comes time to provide a description to the graphic designer. This will help the process run much more smoothly for both of you.
You can download the above book completely free of charge to obtain a check-list of the types of information graphic designers will need from you upfront. Just click on the cover image to be redirected to where it can be downloaded. I highly recommend you read it.
Printers and Publishers Won’t Choose Graphics for You Free of Charge
3 Book Printing Tips for Indie Authors
If you want to include any illustrations, graphics, or images on your book cover—or in your book’s interior, for that matter—you must ensure you have the legal right to use them. There are three ways you can do this: one, you can use photos, illustrations, or graphics that you have personally created and therefore own the copyright to; two, you can purchase them from someone else; or three, you can find public domain stock photos that are deemed as “free for commercial use” and download those. Either way, it’s best if you to provide these files to printers and publishers ahead of time. Otherwise, you’ll spend a lot more money paying them to create or find these files on your behalf.
Click here for more information regarding where and how to find public domain stock photos for yourself. Always respect another artist’s copyright. If you don’t—if you just pull any image file you find off the Internet and use that for your book without first confirming you have the right to use it—you may find yourself involved in an expensive copyright infringement lawsuit down the road.
Printers and Publishers Won’t Choose Paper Stock for You Without Some Input
I fully understand the inclination of an author to say, “Just use the standard interior and cover stock,” when asked what type of paper you want used for your paperback or hardcover books. I get it. You’re thinking that printers and publishers are the experts, so they should know what you need in this regard. Here’s the problem with that: there is no one standard.
As you’re browsing through the bookstore to determine your design preferences, take note of all the different types of books in front of you. Notice how some books are thicker than others. Some covers are glossy and shiny; others are dull. Some interior pages are thin while others are thick. The colours vary. The sizes vary. Everything varies! (Choice is a wonderful thing. But it can also be a bit of a nightmare at times.)
When you’re browsing the bookstore, take note of the types of cover and interior paper stocks that appeal to you most. Take photos of your preferences. Better yet, bring physical samples to show printers and publishers when it comes time to place your order with them.
Printers and Publishers Will Sit Down With You to Discuss All These Details and Make Recommendations
Here’s one more thing printers and publishers have in common: they want to make you happy. When you’re happy, they’re happy!
Once you’ve visited the bookstore and gotten an idea of what you’re looking for, your next best course of action is to book a graphic design meeting to discuss your findings. Ask questions, listen to the recommendations, then make your decisions from there.
Printers and publishers are here to help you create the best book possible. But they need you to help them help you by doing some homework ahead of time. Trust me, it will save you time and money in the long run.
You might consider syndicating this content on your own blog. If you do, make sure to attribute the original source so neither of us gets dinged on the SEO front. You can do that by including this line at the bottom of the article: This content first appeared on the PPG Publisher’s Blog and has been republished here with permission.
The PPG Graphic Design Style Guide was created to ensure all our graphic designers follow the same professional standards for all our books. Each vendor we hire must follow these guidelines.
1. The graphic designer is responsible for sourcing/creating the bar code for each book based on ISBNs supplied by the publisher. The bar code is always placed on bottom right-hand corner of the back cover and PPG logos should appear as shown in this image:
PPG Graphic Design Style Guide
2. The gutter and margins should be set as shown here to ensure proper spacing in final printed book:
Gutter and margins for PPG books
3. When doing initial design samples for clients, send only two samples each of both the entire cover and one interior chapter. The entire cover includes the back cover, spine, and front cover as shown above. The sample chapter should include the title page and a couple extra sample pages to show the client how the margins, headers, footers, fonts, and spacing might appear.
4. Here is a link to the cover generator (barcode generator) that Ingram Content Group (Lightning Source) uses for its books: https://myaccount.lightningsource.com/Portal/Tools/CoverTemplateGenerator. Please use this tool to generate all book cover templates for PPG paperbacks and hardcover books. It will provide the most accurate spine measurement as it factors in LSI’s chosen paper weights here.
Page counts have to be guesstimated in the beginning since we won’t know the final page count until the final version of the book has been completed, so here is a guideline to use when generating a cover template. Typically, there are 300 words on a page (in the average non-fiction/fiction book). So, if a raw manuscript is 50,000 words long, assume that the book will be 167 pages, plus another 13 pages to account for front matter and back matter, for a total of 180 pages. Always round page counts up to the nearest even number. Build the first draft of the cover for this number of pages. Change it as needed as the book changes.
5.Never include a price on a PPG book cover. Only include the barcode excluding the price.
6. Only make the author’s/editor’s/proofreader’s exact changes to a manuscript. Never make judgment calls regarding punctuation or spelling or anything other than graphic design. Punctuation and spelling are the editor’s and proofreader’s jobs. Graphic design is the graphic designer’s job.
English is far from being a simple, straightforward language. There are many different editorial style guides associated with the English language, depending on which country an editor is representing: United Kingdom, Canada, the United States of America, Australia, New Zealand, and South Africa. We all have different ways of spelling and punctuating the English language, so we each use different editorial style guides when editing books.
For this reason, PPG creates a customized editorial style sheet for all our authors—to ensure consistency in editing for each and every one of their books. Since this sheet is only shared with the editor, proofreader, and author, it is impossible for the graphic designer to know which style is being used or make any editorial recommendations.
7. Eliminate all visible widows, orphans, and bad breaks from both the back cover and internal copy of the book. (You may not find them all, and that’s okay. Just do your best. The proofreader will find the rest.) “Square up” the each page so that facing pages are as symmetrical as possible (e.g., you never want the text/graphics on one page to be noticeably longer than the facing page). Symmetry is important to a professional result.
A book’s interior is usually either justified or flush left as shown in the diagram below.
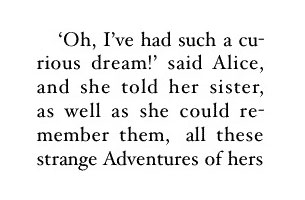
The words “curious” and “remember” are badly broken up in the above sample. To avoid this, you can kern that particular block of text either slightly looser or slightly tighter to ensure the full words land on one line rather than breaking up into two lines. Believe me when I say that extra little detail can subliminally affect the quality of your book in other people’s eyes. It takes no time at all to fix it, so I highly recommend that you do.
Widows and orphans are a concern whether your text is justified or flush left as shown in the below image:
As shown above, a widow is a lone word stuck on a line by itself anywhere in a page; whereas, an orphan is a lone one or two words that have landed by themselves on a line, up on the next page. Both of these things affect the flow and professional appearance of a book whether you realize it or not. Professional publishers always ensure these types of issues are eliminated by meticulously kerning certain blocks of text throughout the book (as opposed to adding in extra line breaks or paragraph breaks in random places to try to correct the issue).
8. Ensure the table of contents and all headers/footers are accurate before sending any proofs to PPG to forward to the author for review. Each draft should be treated as a finished book and sent to the author as complete as possible.
9. The graphic designer’s fees include the cost of up to two stock photos sourced by the graphic designer for the book. Designers should do everything possible to use whatever materials an author has provided in order to mitigate having to purchase additional stock photos up and above the included two. But if, for some reason, additional graphics need to be purchased, the designer must let PPG know the price so PPG can alert the author to either pay for this or provide their own alternatives.
10. All finished and working files must be returned to PPG at the end of the project in a zipped folder that is clear, orderly, and easy for the author to access and sort through.
You might consider syndicating this content on your own blog. If you do, make sure to attribute the original source so neither of us gets dinged on the SEO front. You can do that by including this line at the bottom of the article: This content first appeared on the PPG Publisher’s Blog and has been republished here with permission.
When preparing your digital files for a book publisher, you should follow these important guidelines. File naming conventions are especially important for proper records management.
Preparing Your Digital Files for a Book Publisher
PPG FILE NAMING CONVENTION
Each of your files should be associated with your book title, author name, and the current date. They should also indicate their individual purposes (e.g., book cover graphic, book interior text) so it is easy to differentiate each file.
Your file names should begin with the first five letters of your book title, the first five letters of your legal last name, and MMM DD YYYY for the current date. Here is an example file name for a book titled How to Publish a Book in Canada by Kim Staflund:
HOWTO.STAFL.JAN012017.SAMPLE.DOC
The most important parts of this file naming convention are the first three: the book title, the last name, and the current date. Ensuring consistency and continuity in these three areas will make it easier for everyone involved in the project to find files when they need to down the road. The final part of the file name is a guide to let everyone know what the file is for, and it can be typed in various ways.
Below are some acceptable file names
for author photo files:
HOWTO.STAFL.JAN012017.AuthorPhoto.tiff
for book cover files:
HOWTO.STAFL.JAN012017.CoverGraphic01.jpeg
HOWTO.STAFL.JAN012017.CoverGraphic02.jpeg
for book interior files:
HOWTO.STAFL.JAN012017.InteriorGraphic01.tiff
HOWTO.STAFL.JAN012017.InteriorGraphic02.tiff
HOWTO.STAFL.JAN012017.InteriorText.doc
for promo piece files:
HOWTO.STAFL.JAN012017.PromoGraphic01.jpeg
PREPARING GRAPHIC FILES FOR PPG
A graphic is defined as any picture, illustration, chart, image, logo, or graph you would like placed either in your book interior, on your book cover, or as part of any other marketing materials we may be creating for you.
Colour Graphics
All colour graphics must be submitted to PPG in either .jpg (.jpeg) or .tif (.tiff) format, with a minimum resolution of 300 DPI, using the CMYK colour model.
Black and White Graphics
All black and white graphics must be submitted to PPG in either .jpg (.jpeg) or .tif (.tiff) format with a minimum resolution of 300 DPI. For best results, they should be sent as grayscale/monochrome files rather than CMYK colour files. (We can accept CMYK colour images; however, they may not reproduce as well in black and white as a grayscale/monochrome image will.)
All graphics for your book (including all author photos) must be sent to PPG at the same time your interior text is sent.
PREPARING TEXT FILES FOR PPG
PPG will only accept text files (e.g., your manuscript) in Microsoft Word format with nothing more than the following formatting. This ensures the file is clean, making it easier for editors and designers to work with it.
Include all front matter, body, back matter, and back cover copy in this document in exactly the order you wish to see it appear in the final designed version of your book (NOTE: back cover copy should be placed at the very end and labelled as [Insert back cover copy here] so the designer knows what it is and where to eventually place it; but it must be included in the original text document so it can be properly edited along with everything else).
Leave room for the copyright page within your front matter (e.g., simply insert a blank page that says [Insert copyright page here] at the top of it, and PPG will take care of the rest for you).
Times New Roman font, 11 pt. size, left-aligned text
Entire document double-spaced
The only hard returns in this document should be at the end of chapter titles and paragraphs
Insert a page break at the end of each section and/or chapter
Insert an additional page break where you want blank pages to appear
Type [Insert image file name here with the following caption: caption text] where you wish to see an image and caption inserted. DO NOT INSERT THE IMAGE YOURSELF.
Italicize any words/phrases you wish to see italicized in the formatted version of your book
Bold any words/phrases you wish to see bolded in the formatted version of your book
Underline any words/phrases you wish to see underlined in the formatted version of your book
Preparing Your Digital Files for a Book Publisher
These guidelines for preparing your digital files for a book publisher are designed to make your life easier. You’ll be able to find the files you need more quickly all along the way. And it will be easier for everyone involved in your book project to keep everything organized.
You might consider syndicating this content on your own blog. If you do, make sure to attribute the original source so neither of us gets dinged on the SEO front. You can do that by including this line at the bottom of the article: This content first appeared on the PPG Publisher’s Blog and has been republished here with permission.
The elements of a physical book interior include the front matter, body, and back matter. Each element might differ slightly depending on the type of book being published. For example, a non-fiction book will contain an index in its back matter whereas a fictional novel will not. Following is a list of the components you might find within each interior element.
The Elements of a Physical Book Interior
The front matter of a book might contain some or all of the following components:
Primary title page: This is usually the very first page of the book in which the title appears on an otherwise blank right-hand page.
Secondary title page: The secondary title page repeats the book title along with the author and publisher’s name on the next right-hand page.
Copyright page: The copyright page will contain the book’s ISBN(s), publication date, copyright owner’s name, and a copyright notice such as, “No portion of this book may be duplicated or used in any form by any electronic or mechanical means (including photocopying, recording, or information storage and retrieval) for any profit- driven enterprise without prior permission in writing from the publisher.” If the author also wishes to credit any of the book’s contributors (e.g., photographers and designers), that can also be done on this page.
Quote page: Sometimes a quote will be placed in the front matter if it sums up the essence of the story quite well.
Dedication page: Oftentimes, authors will dedicate their books to their loved ones. That dedication is placed in the beginning of the book.
Acknowledgments page: An acknowledgments page allows an author to provide more detail when crediting the book’s various contributors rather than just listing their names on the copyright page. Here, a heartfelt thank you can be expressed in a much more meaningful way.
Foreword: Usually, a foreword is written by someone other than the author. Its purpose is to provide a history leading up to the story being told or explain what inspired the publication of the book.
Preface: Where a foreword is an introduction to the book written by someone other than the author, a preface is an introduction written by the author for the same purpose. An author might also use a preface to explain what methods of research were used during the creation of the work.
Contents: A table of contents lists the various sections (i.e., chapters, articles, poems, et cetera) within the book and that page numbers on which they begin.
The body of a book usually contains at least the following two components:
Title Pages: A title page is used at the beginning of each section within the body of a book. The purpose of the title page is simply to differentiate between the sections to help organize the flow of the work.
Sections: Sections of a book’s body can be divided up as chapters, poems, articles, et cetera. It all depends on the type of book being published.
The back matter of a book might contain some or all of the following components:
Appendix: An appendix contains supplementary details that help to clarify further any legal, technical, or scientific information within the book.
Bibliography (a.k.a. Citations): A bibliography is a list of the books, articles, webpages, et cetera, that were sourced and referred to throughout the book.
Glossary: A glossary of terms contains a list of specialized words that can be found throughout the book along with their definitions.
Index: An alphabetized index is used to help readers pinpoint the exact pages where they can find an important name, place, or subject throughout the book. (It provides a much more precise, defined search result than the table of contents at the front does.)
Promotional Content: A great way to sell your back list titles is to promote them in the back matter of each new release. It is best if you can provide a graphic of each book’s front cover along with the corresponding ISBNs. This way, readers can search for these back list titles online or at bookstores if they wish to purchase them.
Author Biography: An updated author biography helps personalize your book for readers by giving them a bit more information about the storyteller. It is also a great way to promote past titles, thereby increasing the chance of more sales.
The Elements of a Physical Book Interior
When writing your book, keep in mind all of the above elements. Bookmark places for them within your manuscript so you remember to add them in before submitting to a publisher. These extra details will add a certain air of professionalism to your published book.
You might consider syndicating this content on your own blog. If you do, make sure to attribute the original source so neither of us gets dinged on the SEO front. You can do that by including this line at the bottom of the article: This content first appeared on the PPG Publisher’s Blog and has been republished here with permission.
There are different types of physical book covers ranging from case-wrapped hardcovers (cloth or laminate) or dust-jacketed cloth hardcovers to perfect bound paperbacks. Although they each have their own unique requirements in content and design, some basic elements are common to them all. Using two of my backlist paperback books as examples, you can see all the elements of a physical book cover. Each one is made up of at least the following three components: the back cover, the spine, and the front cover.
The Elements of a Physical Book Cover
Back Cover
As shown in the above visual aid, the back cover portion of a physical book cover begins on the left-hand side. The dimension of the back cover must match whatever trim size you’ve chosen your book to be (i.e., 5.5 x 8.5 inches as shown in the examples) with a minimum 1/4-inch bleed around the outside edges for trimming. It will also contain the following features:
An author photo (optional)
Back cover copy (marketing copy that summarizes the contents of the book in a compelling way)
Room for the book’s barcode and ISBN on the lower right-hand corner
Room for the publisher’s logo on the lower left-hand corner
A short author biography (optional)
Spine
The spine portion of a physical book cover sits in between your back and front cover. Its height will match your chosen trim size (in the case of these examples 8.5 inches). Meanwhile, the width is determined by other factors. Two factors are the final page count of your designed interior and the paper stock being used. The spine also contains the following features:
The book title at the top
Author name (pseudonym) in the centre
Room for the publisher’s logo
Front Cover
The front cover portion of a physical book cover sits on the right-hand side. The dimension of the front cover must match whatever trim size you’ve chosen your book to be (i.e., 5.5 x 8.5 inches as shown in the examples) with a minimum 1/4-inch bleed around the outside edges for trimming. It will also contain the following features:
The book title (and subtitle, if applicable)
Author name (pseudonym)
Additional graphics will require additional graphic design time
The Elements of a Physical Book Cover
Your cover artwork can wrap around the spine of your book and span the entire height and width of the complete cover (as shown in the first visual for the book titled 11:11); it can appear on the front cover only (as shown in the second visual for the book titled A Letter to My Son); or it can be more complex (as shown in the third visual for the book titled A Letter to My Daughter).
All of these examples are correct. If going with the first example, make sure the artwork itself contains a minimum 1/4-inch bleed all around the edges. This will ensure the outside edges of the picture aren’t trimmed unnecessarily at the printer. If going with the third example, keep in mind that additional graphics require additional work for the designer. This will equate to additional upfront design costs.
You might consider syndicating this content on your own blog. If you do, make sure to attribute the original source so neither of us gets dinged on the SEO front. You can do that by including this line at the bottom of the article: This content first appeared on the PPG Publisher’s Blog and has been republished here with permission.
Why do authors need graphic designers? Because it takes a true specialist to understand and follow each printer’s unique file creation guide.
Why do authors need graphic designers?
What is a file creation guide?
For independent (“indie”) authors who wish to produce ebooks alone, things are pretty simple. You can write your book using Microsoft Word and create a simple but attractive book cover using Canva or Amazon.
It’s when you want to create a paperback or hardcover book that things get tricky, particularly if you want that book sold in traditional bookstores. In this case, you’ll need to use a company like IngramSpark® or Lightning Source® (both Ingram Content Group subsidiaries) as your printer/distributor. They each have specific requirements regarding how your cover and interior book files should be designed. These detailed instructions are listed in multi-page file creation guides. And, unless you’re familiar with how to use Adobe Creative Suite or similar programs, you probably won’t be able to understand or follow those instructions. But a professional graphic designer will.
Why do authors need graphic designers?
Perhaps the most important reason independent authors need graphic designers is for their knowledge of colours. Believe it or not, colours are much more complicated than you may realize. How something looks on your computer screen may look completely different in printed format. There are many different reasons why.
For starters, RGB (red, green, blue) colours are what you see on your computer screen. They are created using light. CMYK (cyan, magenta, yellow, and black) colours, on the other hand, are created by mixing inks/toners together in varying percentages.
When you are creating an ebook only, it’s okay to use RGB colours in your design. But if you plan to print a paperback or hardcover version of your book, you should design it using CMYK colours. Otherwise, your printer may not be able to match the colours you’ve chosen since printers have a smaller colour gamut available than computer screens do.
That’s just the tip of the iceberg in terms of the specialized knowledge graphic designers have to offer. You can (and should) provide a draft layout of your book’s cover and interior so your designer knows upfront what you’re looking for. But let him or her do the rest. It will be well worth it, I promise.
PPG’s Graphic Design Process
Once your manuscript is edited, it will be given to a professional graphic designer. He or she will work hard to complete a professional design of both your book cover and interior within the agreed-upon project timeline/deadline.
The design component of your PPG publishing package includes:
two sample cover designs and two sample interior designs for you to choose one each from (before any full proofs are completed and sent out)
one colour cover with either a b/w or colour interior (plus up to 10 interior graphics automatically included in each graphic design package)
a half hour phone consultation with the graphic designer (if needed)
two proofing rounds (two .PDF proofs of each component) with up to five structural changes to the cover and up to 50 typographical changes to the interior allowed per round
one hard proof (physical book) for final proofreading
If you need more than the standard two .PDF proofing rounds and one hard proof, you can purchase these items separately. Keep in mind that doing so will extend your book publishing timeline and also increase your costs.
You might consider syndicating this content on your own blog. If you do, make sure to attribute the original source so neither of us gets dinged on the SEO front. You can do that by including this line at the bottom of the article: This content first appeared on the PPG Publisher’s Blog and has been republished here with permission.
Every book is a little bit different. But this project timeline template will help you guesstimate how much time it will take to publish your book. It is essentially the same process for all books: fiction, non-fiction, poetry, children’s books, et cetera. But some books will require all the below steps (e.g., non-fiction books require indexing) while others won’t.
Project Timeline Template for Book Publishers (Project Management)
Traditional Project Timeline Template for Book Publishers
Below is the approximate amount of time it takes to publish a paperback book the traditional way. For a 30,000-word non-fiction book, you can expect the entire process to take around four months. If your book is twice as large (e.g., 60,000+ words), then expect to double the amount of time it will take each person to complete his or her duties within the project. Plus, you can add up to another four weeks if you plan to print any books once the publishing process itself is complete.
Title of the Book: Sample Non-Fiction Book
Author Name(s): Jane Doe
Genre: non-fiction
Format: paperback
Trim Size: 6″ x 9″
Word Count: 30,000
Picture Count: up to 10 interior graphics automatically included in each graphic design package
Colour or B/W Interior: b/w
WORK-MADE-FOR-HIRE VENDORS
PPG Publishing Services (Project Manager)
Copy editor
Fact checker
Indexer
Graphic designer
Proofreader
PROJECT TIMELINE
Order
Vendor/Author(s)
Project Duties
Deadline
1
Author
Order publishing package (prepay)
June 26, 2017
2
Author
Digitally sign publishing agreement and submit to PPG
June 26, 2017
3
Author
Send Production Questionnaire to PPG
June 26, 2017
4
Author
Submit manuscript and interior graphics to PPG
June 26, 2017
5
Author
Submit cover text and graphics to PPG
June 26, 2017
6
PPG
Order ISBN & barcode
June 26, 2017
7
PPG
Submit contracts to PPG vendors
June 26, 2017
8
ALL Vendors
All vendors return signed contracts and initial invoices
June 26, 2017
9
PPG
50% deposits sent to vendors
June 27, 2017
10
PPG
Send manuscript to copy editor
June 28, 2017
11
Editor
Copy editing
July 11, 2017
12
Editor
Return copy edited manuscript to PPG
July 12, 2017
13
PPG
Review and send copy edited manuscript to author for approval
July 12, 2017
14
Author
Finish reviewing copy edited manuscript
July 18, 2017
15
Author
Return reviewed/approved copy edited manuscript to PPG
July 19, 2017
16
PPG
Send ISBN and barcode to graphic designer for cover
July 20, 2017
17
PPG
Send graphics and copy edited manuscript to designer
July 20, 2017
18
Designer
Complete and send two sample cover/interior designs to PPG
July 22, 2017
19
PPG
Review and send the two sample cover/interior designs to author
July 23, 2017
20
Author
Choose one cover design and one interior design and let PPG know
July 25, 2017
21
PPG
Let designer know author’s choice of cover/interior design
July 25, 2017
22
Designer
Design cover and interior of book
August 7, 2017
23
Designer
Send first round .PDF proofs of cover and interior to PPG
August 8, 2017
24
PPG
Check over first round .PDF proofs and then send to author
August 8, 2017
25
Author
Complete first proofing round
August 14, 2017
26
Author
Send changes (if applicable) back to PPG
August 15, 2017
27
PPG
Check author’s comments and send first round changes back to designer
August 15, 2017
28
Designer
Complete changes and send next .PDF proofs to PPG
August 22, 2017
29
PPG
Check over .PDF proofs and then send to author
August 22, 2017
30
Author
Complete second proofing round
August 28, 2017
31
Author
Send changes (if applicable) or approval back to PPG
August 29, 2017
32
PPG
Check author’s comments and send second round changes/approval back to designer
August 29, 2017
33
Designer
Complete changes and send next .PDF proof to PPG
September 4, 2017
34
PPG
Check over .PDF proofs and then send back to author for approval
September 4, 2017
35
Author
Review and send approval back to PPG
September 5, 2017
36
PPG
Send approved .PDF interior to Indexer
September 5, 2017
37
Indexer
Complete index of the interior
September 18, 2017
38
Indexer
Send index in Word.doc format back to PPG
September 19, 2017
39
PPG
Review and forward index to designer to insertion into the .PDF
September 19, 2017
40
Designer
Insert index into .PDF
September 20, 2017
41
Designer
Return print-ready .PDF of interior and .jpeg of cover to PPG
September 20, 2017
42
PPG
Submit print-ready files to printer and order hard copy proof
September 21, 2017
43
PPG
Order hard copy proof for proofreader (Can take up to two weeks to receive this from the printer.)
October 5, 2017
44
PPG
Send suggested retail price to author for approval
October 5, 2017
45
Author
Reply to PPG with chosen retail price for book.
October 6, 2017
46
Proofreader
Complete professional proofread of hard copy proof
October 18, 2017
47
Proofreader
Return proofread hard copy proof to PPG
October 19, 2017
48
PPG
If more changes, submit to designer to complete changes and mail hard copy proof to author
October 19, 2017
49
Designer
Complete proofreader changes and submit updated .PDF proof to PPG
October 23, 2017
50
PPG
Review and send .PDF to author for review along with hard copy proof
October 23, 2017
51
Author
Compare hard proof to new .PDF proof and send final sign-off to PPG
October 25, 2017
52
PPG
Request all final-approved working and finished files back from designer
October 26, 2017
53
Designer
Send all final working and finished files back to PPG
October 27, 2017
54
PPG
Send author all final working and finished files
October 27, 2017
55
PPG
Submit final files to printer/online distributor(s)
October 27, 2017
56
PPG
Organize one book signing event at a local book store for author
October 27, 2017
57
Author
Print books (Depending on how many copies are being printed, this can take up to four weeks.)
November 17, 2017
58
Author
Submit book copies to Legal Deposit at Library and Archives Canada
October 27, 2017
59
PPG
Update PPG Facebook page
October 27, 2017
60
PPG
Update PPG blog
October 27, 2017
Project Timeline Template for “Rapid Release” Publishing
In 2018, I discussed the many merits of “rapid release” publishing (e.g., releasing a new book every six weeks). Obviously, the above traditional project timeline template won’t work for independent authors who wish to self-publish an SEO-friendly book series like that. They will require a different approach as outlined in this mini ebook series. But for those of you who wish to produce only one book at a time the traditional way, you can use the above template as your guide.
Does “rapid release” publishing appeal to you more than the traditional publishing process does? If yes, here are 7 Tips to Help You Write a Book FAST!
You might consider syndicating this content on your own blog. If you do, make sure to attribute the original source so neither of us gets dinged on the SEO front. You can do that by including this line at the bottom of the article: This content first appeared on the PPG Publisher’s Blog and has been republished here with permission.